---
title: "How to Change Aspect Ratio: A Creator's Guide for 2026"
canonical: "https://blitzreels.com/blog/how-to-change-aspect-ratio"
---
# How to Change Aspect Ratio: A Creator's Guide for 2026
URL: https://blitzreels.com/blog/how-to-change-aspect-ratio
Markdown URL: https://blitzreels.com/blog/how-to-change-aspect-ratio.md
Published: 2026-05-17
Author: BlitzReels
Learn how to change aspect ratio for any video. Our guide covers cropping, padding, and reframing for TikTok, Reels, & Shorts on desktop, mobile, and with AI.
Tags: how to change aspect ratio, video aspect ratio, short form video, video editing, social media video

You've probably done this already. You export a clean, polished widescreen video, drop it into TikTok or Reels, and suddenly the result looks weak. The frame is tiny, the subject is hard to see, and the part that mattered most might sit outside the vertical crop.
That's why learning **how to change aspect ratio** matters more than most creators think. It isn't just a formatting fix. It changes how your video fills the screen, where attention goes, and whether your hook lands in the first seconds on a phone.
Most creators start by asking, “How do I resize this?” The better question is, “How do I resize this without losing the shot?”
## Table of Contents
- [Why Your Aspect Ratio Matters More Than Ever](#why-your-aspect-ratio-matters-more-than-ever)
- [Why this affects views, not just visuals](#why-this-affects-views-not-just-visuals)
- [The three ways creators usually adapt footage](#the-three-ways-creators-usually-adapt-footage)
- [Choosing Your Method Cropping vs Padding vs Reframing](#choosing-your-method-cropping-vs-padding-vs-reframing)
- [Cropping when the middle already does the work](#cropping-when-the-middle-already-does-the-work)
- [Padding when composition matters most](#padding-when-composition-matters-most)
- [Reframing when attention has to follow the action](#reframing-when-attention-has-to-follow-the-action)
- [Changing Aspect Ratio with Desktop Software](#changing-aspect-ratio-with-desktop-software)
- [The sequence-first workflow that holds up](#the-sequence-first-workflow-that-holds-up)
- [What works in Premiere and Resolve](#what-works-in-premiere-and-resolve)
- [Where desktop editing wins](#where-desktop-editing-wins)
- [A simple desktop decision guide](#a-simple-desktop-decision-guide)
- [Quick Aspect Ratio Edits on Mobile Apps](#quick-aspect-ratio-edits-on-mobile-apps)
- [A clean mobile workflow](#a-clean-mobile-workflow)
- [When mobile editing is the smart choice](#when-mobile-editing-is-the-smart-choice)
- [The trade-offs you should expect](#the-trade-offs-you-should-expect)
- [Automated Reframing with AI for Perfect Shorts](#automated-reframing-with-ai-for-perfect-shorts)
- [What AI reframing actually does well](#what-ai-reframing-actually-does-well)
- [Where automation beats manual work](#where-automation-beats-manual-work)
- [The right way to use AI reframing](#the-right-way-to-use-ai-reframing)
- [Best Practices for Social Media Aspect Ratios](#best-practices-for-social-media-aspect-ratios)
- [Shoot for the crop](#shoot-for-the-crop)
- [Use the right ratio for the placement](#use-the-right-ratio-for-the-placement)
- [Respect safe zones](#respect-safe-zones)
- [Troubleshooting Common Aspect Ratio Problems](#troubleshooting-common-aspect-ratio-problems)
- [My video looks stretched or squashed](#my-video-looks-stretched-or-squashed)
- [My video has ugly black bars](#my-video-has-ugly-black-bars)
- [I cropped out the most important part of my video](#i-cropped-out-the-most-important-part-of-my-video)
## Why Your Aspect Ratio Matters More Than Ever
Aspect ratio sounds technical, but the concept is simple. **It's the ratio of width to height**. A **1920 × 1080** display reduces to **16:9** because the greatest common factor is **120**, which is why 16:9 became the standard widescreen format and why understanding that math helps you convert footage without distortion, as explained in this [aspect ratio calculator reference](https://www.calculatorsoup.com/calculators/technology/aspect-ratio-calculator.php).
For creators, that math turns into a practical decision. A horizontal interview might look great on YouTube, but the same clip can feel cramped or distant on TikTok if you don't adapt it for a vertical screen. The issue isn't only size. It's attention. On short-form platforms, the frame itself helps decide what the viewer notices first.
If you want a quick reference for platform sizing before you export, this [aspect ratio guide for social media managers](https://bulkimagegeneration.com/tools/aspect-ratio-calculator) is useful because it helps you think in outputs, not just in raw dimensions. If you want the basic terminology cleanly defined, BlitzReels also has a simple [aspect ratio glossary entry](https://www.blitzreels.com/glossary/aspect-ratio).
### Why this affects views, not just visuals
A badly formatted short usually fails in familiar ways:
- **The subject looks too small:** The viewer sees empty background instead of the face, product, or action.
- **Text competes with the crop:** Your headline, captions, or demo labels drift toward the edges.
- **The frame fights the platform:** The clip technically uploads, but it doesn't feel native.
> **Practical rule:** If the viewer has to work to find the focal point, your aspect ratio choice is already hurting the video.
### The three ways creators usually adapt footage
When you change aspect ratio, you're usually doing one of three things:
1. **Cropping** to remove part of the original frame.
2. **Padding** to preserve the full image inside a different canvas.
3. **Reframing** to actively reposition the shot so the important subject stays central.
Each method solves a different problem. Cropping helps when the center is already strong. Padding helps when the original composition matters more than screen fill. Reframing is usually the best fit when you need the video to feel native on Reels or Shorts without sacrificing the story.
## Choosing Your Method Cropping vs Padding vs Reframing
Before you open Premiere, CapCut, or any browser editor, decide what you're optimizing for. Full-screen impact. Visual integrity. Or subject focus. That choice determines your method more than the software does.
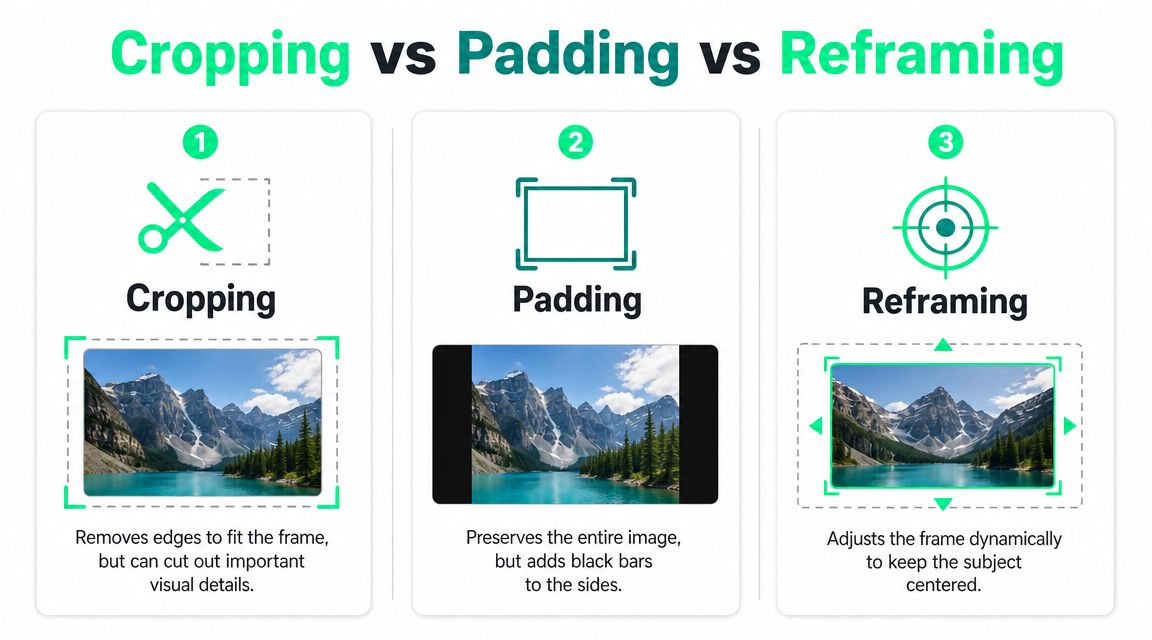
A lot of creators treat these options like technical settings. They're editorial choices. The crop you choose can change whether the joke lands, whether the product stays visible, or whether the viewer understands who to watch.
If you want a deeper definition of the dynamic approach, this [video reframing glossary page](https://www.blitzreels.com/glossary/video-reframing) is a solid reference.
### Cropping when the middle already does the work
Cropping is the fastest path. You cut away the edges and let the center of the original shot fill the new frame.
That works well when the important thing is already near center. A talking-head video, a solo product demo, or a close-up tutorial often survives this approach with minimal effort. It breaks fast when the action lives on the edges, such as a two-person podcast shot or a wide reaction moment.
**Best use cases for cropping**
- **Single speaker content:** Interviews, explainers, reaction videos
- **Tight product shots:** Hands, packaging, screens, details
- **Fast turnarounds:** When speed matters more than precision
The trade-off is obvious. You gain screen presence, but you may lose context.
### Padding when composition matters most
Padding keeps the original frame intact and places it inside a different canvas. That usually means bars around the video, though many creators improve the look with a blurred duplicate background instead of plain black space.
This is the safer option when your original composition carries meaning. Think cinematic footage, travel edits, event recaps, or any scene where cutting the edges would remove visual balance. It's also useful when multiple people are spread across a wide frame and you don't want to choose one person over another.
> Padding preserves the shot. It doesn't make the shot feel native to a vertical feed.
That's the downside. It protects the image, but it gives up screen real estate.
### Reframing when attention has to follow the action
Reframing is the method most short-form creators need. Instead of just trimming or boxing the video, you move the crop window so the subject stays where the viewer expects it.
For example, if you're converting a podcast clip from widescreen to vertical, a center crop might split the difference between two speakers and make both look awkward. Reframing lets you follow whoever is speaking, keep eye contact strong, and preserve the emotional beat of the clip.
Here's the practical comparison:
| Method | What it does | Where it works | What usually goes wrong |
|---|---|---|---|
| **Cropping** | Removes edges to fill the new frame | Solo subjects, centered action | Important details get cut out |
| **Padding** | Preserves full frame inside a new canvas | Cinematic edits, wide scenes | Video feels smaller on mobile |
| **Reframing** | Moves the crop to keep focus on the subject | Interviews, podcasts, movement-heavy clips | Needs more editorial attention |
If your goal is more screen-filling, watchable short-form content, reframing usually beats a blind crop.
## Changing Aspect Ratio with Desktop Software
Desktop editors still give you the best control when the shot needs careful handling. That matters when you're working with interviews, product demos, podcasts, or any footage where the framing changes from clip to clip.
The most reliable workflow in Adobe Premiere Pro is straightforward. **Set the sequence frame size first**, such as **1080×1920** for vertical, then refine **Scale** and **Position** in Effect Controls. Simple resizing without reframing can leave key action off-center and visually unusable, as outlined in this [Premiere Pro aspect ratio workflow guide](https://borisfx.com/blog/how-to-change-aspect-ratio-in-premiere-pro/).
That sequence-first habit saves time because you're making editorial decisions inside the correct output from the start. You're not finishing a widescreen timeline and then trying to rescue it later.
### The sequence-first workflow that holds up
In Premiere Pro, DaVinci Resolve, and Final Cut Pro, the most dependable process looks like this:
1. **Choose the destination first**
Decide whether this clip is for 9:16, 1:1, or another format before you edit the details.
2. **Create a new sequence or timeline at that size**
Don't keep the old widescreen timeline and hope a final export setting will solve the problem.
3. **Drop in the source footage**
The video will usually appear too large, too small, or awkwardly cropped at first. That's normal.
4. **Adjust framing shot by shot**
Use scale and position controls to keep the subject inside the new crop area.
5. **Check motion, not just static composition**
A frame that looks good at the start of a clip can fail two seconds later if the speaker leans, gestures, or walks.
### What works in Premiere and Resolve
Premiere's **Auto Reframe Sequence** can be a strong first pass for social edits. It helps retarget footage to a new ratio automatically, which is especially useful when you're clipping long-form content into multiple shorts. But it still needs review. It solves rough placement faster than manual keyframes. It doesn't always preserve the strongest storytelling emphasis.
In DaVinci Resolve, many editors set the timeline to a portrait or custom preset and then use a fill-style scaling approach with crop so the image stays full frame while edge content gets trimmed. That's a practical pro workflow when the source is widescreen and the destination is vertical.
> A correct canvas doesn't guarantee a good frame. The sequence can be right while the shot is still wrong.
### Where desktop editing wins
Desktop software is the right call when:
- **You need shot-level judgment:** Podcasts, interviews, panels, tutorials with screen inserts
- **Text placement matters:** Captions, lower thirds, hooks, product labels
- **You're delivering several outputs:** One cut for Reels, another for feed, another for YouTube
It's slower than mobile editing, but the control is worth it when the details matter.
### A simple desktop decision guide
| Situation | Best approach |
|---|---|
| **One speaker, little movement** | Start with auto-reframe, then inspect each shot |
| **Two speakers in one wide frame** | Manual reframing or split layout |
| **Product demo with hands and on-screen text** | Manual adjustment for every key beat |
| **Fast social repurpose with limited time** | Preset sequence, auto pass, quick cleanup |
The main mistake is treating aspect ratio conversion like a resize command. In practice, it's recutting composition for a new screen.
## Quick Aspect Ratio Edits on Mobile Apps
Mobile apps are the fastest answer when you've filmed something and want it posted the same day. For a lot of creators, that's not a compromise. It's the workflow.
CapCut, InShot, VN, and similar apps make **how to change aspect ratio** feel simple because they hide most of the technical setup. You import the clip, tap **Ratio** or **Canvas**, and pick the destination format. For short-form publishing, that speed matters when you're batching Stories, cutting event clips on-site, or turning a quick talking point into a Reel before the moment passes.
### A clean mobile workflow
The easiest mobile process is:
- **Import the clip**
- **Pick the destination ratio**
- **Pinch to zoom and drag to reframe**
- **Preview the full clip**
- **Export and upload**
That sounds basic, but the preview step is where most creators save themselves. A frame that looks right in the first second can drift during movement, especially if the subject turns or steps sideways.
### When mobile editing is the smart choice
Mobile apps are a strong fit when the clip is visually simple. A single person speaking to camera, a product close-up, or a clean b-roll shot usually adapts well with touch controls alone.
They're also useful when you need platform-first speed. If you're filming for an Instagram Story in the moment, there's no reason to wait for a desktop session unless the clip has more complexity than the app can handle cleanly.
> The biggest mobile editing mistake isn't low effort. It's trusting the default crop without watching the whole clip.
### The trade-offs you should expect
Mobile editors are convenient, but they have limits:
- **Less precise shot control:** Fine keyframing and detailed multi-shot reframing can feel clumsy on a phone.
- **Harder text management:** Hooks, subtitles, and overlays can become crowded fast.
- **More temptation to rush:** Because the tools are fast, creators often skip review.
If the clip is simple, mobile editing is often enough. If the clip has multiple speakers, movement across the frame, or important visuals near the edges, desktop or automated reframing usually gives you a better result.
## Automated Reframing with AI for Perfect Shorts
Manual reframing gets old fast. If you've ever taken a long interview, webinar, podcast, or talking-head video and tried to convert every usable moment into vertical clips, you already know the pain. The first few shots are fine. The next batch becomes repetitive. After that, it turns into cleanup work.
That's where AI reframing earns its place. The primary challenge isn't just changing the canvas. It's preserving the subject's emphasis. AI-driven auto-reframing addresses the key question creators essentially have: **how do I keep my speaker centered when converting from 16:9 to 9:16?** That's the problem most basic crop tutorials don't solve, as discussed in this [AI framing and viewpoint control article](https://higgsfield.ai/blog/Change-the-Angle-of-Any-Image).
### What AI reframing actually does well
Good automated reframing tools don't just resize. They analyze the shot and try to preserve the focal point as the output changes. For creators making Shorts, that usually means the face, body movement, or active object stays visually dominant inside a vertical frame.
This matters most in clips where the original widescreen layout wasn't designed for phone viewing. Podcasts are the classic example. A wide two-person setup may look balanced on a desktop player, but a simple center crop can leave you with half a face, dead space, or the wrong speaker holding the frame.
A useful overview of what creators should look for in these workflows appears in this [guide to AI tools for perfect vertical video framing](https://www.blitzreels.com/blog/ai-tools-for-perfect-vertical-video-framing).
### Where automation beats manual work
AI reframing is strongest in repeatable production situations:
- **Podcast clipping:** When the active speaker changes often
- **Interview repurposing:** When headroom and eye line need constant correction
- **Educational videos:** When the presenter moves while explaining
- **Batch output:** When one source video needs several short-form assets
It won't replace judgment. You still need to check captions, product placement, and moments where the algorithm favors motion over meaning. But it removes a large chunk of the repetitive framing work.
Here's a quick visual example of the kind of workflow creators now expect from automated short-form tools:
### The right way to use AI reframing
Treat AI as a first editor, not the final editor.
Start with the automated pass. Then review the shots where timing, emotion, or visual context matters most. That usually gives you the best balance of speed and control. If you're posting several clips a week, this approach is far more sustainable than manually keyframing every frame shift from scratch.
> If the whole point of the clip is the speaker's face, losing that face for even a moment is a framing failure.
For creators producing shorts regularly, automated reframing isn't a gimmick. It's the difference between repurposing consistently and leaving usable footage untouched.
## Best Practices for Social Media Aspect Ratios
The creators who handle aspect ratio best usually make the decision before they edit. Often, they make it before they shoot. That one habit changes everything.

The most effective multi-format workflows use **non-destructive conversions** like **smart padding** and **modular templates** to preserve composition across ratios. The key shift is to think about distribution from the start, not as a one-off edit, as described in this [multi-placement aspect ratio conversion guide](https://www.marpipe.com/ad-glossary/convert-aspect-ratios-without-cropping).
That's the difference between scrambling to rescue one video and building a system that works every week.
### Shoot for the crop
If you're filming in 16:9 but know you'll also need vertical outputs, keep the subject closer to the center than you normally would for pure widescreen composition. Leave enough room around the face, product, or hands so a tighter vertical window still works later.
This doesn't mean every shot should look centered and flat. It means your most important information shouldn't live at the extreme edges unless you know you'll stay in a wide orientation.
### Use the right ratio for the placement
Different placements reward different framing choices. A vertical short wants full-screen presence. A feed post may benefit from a format that preserves a bit more lateral composition.
A good rule of thumb:
- **Use 9:16** for TikTok, Reels, Stories, and Shorts when you want the video to feel native and immersive.
- **Use 4:5** when you're posting into a feed and want a strong mobile footprint without going fully vertical.
- **Use 1:1** when the creative needs balanced symmetry or easier cross-platform reuse.
If you want platform-specific context for TikTok in particular, this [SleekPost TikTok guide](https://sleekpost.com/blog/tiktok-aspect-ratio) is a helpful companion.
### Respect safe zones
Even a well-cropped video can fail if the text sits where the platform UI covers it. Usernames, buttons, captions, and interface overlays can compete with your message.
Keep these elements away from the outer edges when possible:
| Element | Safer placement choice |
|---|---|
| **Hook text** | Upper central area, not flush to the top |
| **Captions** | Low enough to read, high enough to avoid interface clutter |
| **Product labels** | Near the subject, not hugging the sides |
| **Call to action text** | Clear of where platform buttons usually sit |
> Good framing gets attention. Safe placement keeps your message readable after upload.
The cleaner your shot planning is upfront, the less destructive your edits need to be later.
## Troubleshooting Common Aspect Ratio Problems
Most aspect ratio problems come down to three visible mistakes. The good news is they're easy to diagnose once you know what you're looking for.
### My video looks stretched or squashed
This happens when the clip is resized without preserving its original proportions. The fix is simple. Don't drag width and height independently unless you intentionally want distortion. Use preset aspect ratios or locked scaling so the image keeps its natural shape.
If a person suddenly looks wider or taller than normal, stop there. That's not a platform issue. It's a scaling issue.
### My video has ugly black bars
Black bars appear when the original frame is preserved inside a canvas that doesn't match it. Sometimes that's acceptable. Often it just wastes screen space.
Try one of these fixes:
- **Scale to fill** if the edge loss is minor
- **Use a blurred background** if you need to preserve the full frame
- **Reframe manually** if the default fill cuts off the subject
### I cropped out the most important part of my video
This is the classic center-crop failure. The software filled the frame, but it didn't understand the story. The speaker drifted out of view, the product demo got clipped, or the text landed off-screen.
The fix depends on the clip:
- **Use manual position adjustments** for short, important moments
- **Use keyframes** when the subject moves across the frame
- **Use AI reframing** when you're converting many clips and need consistent subject tracking
The fast test is this. Mute the video and watch the frame. If your eye still lands on the right thing immediately, the aspect ratio change is working.
---
If you're turning longer videos into short-form content regularly, [BlitzReels](https://blitzreels.com) is worth a look. It helps you upload footage, generate vertical cuts, keep faces centered with auto reframing, add captions, and export shorts sized for TikTok, Reels, and YouTube Shorts without getting stuck in a traditional editing timeline.